Library
EndNote tips
Getting started
Get EndNote installed on your computer or laptop.
See the EndNote website for guides to getting started, or watch video tutorials on the EndNote YouTube channel.
Get EndNote Click, a free browser plugin to access full text PDFs quickly.
See our tips below, arranged by topic. Ask a Librarian if your question is not answered here.
Adding references
Export references directly from databases into EndNote
Avoid manually typing references into EndNote. Instead, use the direct export features available in your database, being sure to select options to export all fields from your search records so that all available information is gathered.
Follow our step-by-step instructions in Fact Sheet no.12 for Ovid databases (Medline, Embase, and APA PsycInfo); Ebsco databases (Medline, CINAHL, and ERIC); PubMed and The Cochrane Library.
Export citations from PubMed
- Perform your search then choose Send to:
- Choose Citation Manager
- Select All results on this page, All results, or Selection
- Create file
- Save the .nbib file, then double click to open in EndNote

Export from Scopus into EndNote
You must have a Melbourne University affiliation to access Scopus.
Perform your search in Scopus, then:
- Select the references you wish to export either individually, or Select all or Select all on this page.
- Select RIS or EndNote (RIS) as your Export format.
- Save the downloaded scopus.ris file.
Open your EndNote library, then:
- Go to File/Import.
- Choose the RIS file you downloaded and choose Reference Manager (RIS) from the Import Option field.
- Select Import.
Export from Web of Science into EndNote
You must have a Melbourne University affiliation to access Web of Science.
Perform your search in Web of Science, then:
- Select your results and choose Export.
- In Record Options choose either your selected results, all records on current page, or a range (max = 1000).
- In Record Content select Full Record.
- Select Export.
- Save the .ciw file.
Open EndNote, then:
- Go to File/Import/File.
- Import File: Choose… your saved .ciw file.
- Import Option: select Web of Science Core Collection (Clarivate) (or select Other filters to locate the Web of Science filter).
- Duplicates: Discard Duplicates.
Configure Google Scholar to send references to EndNote
Sign in to Google Scholar:
- Go to Settings.
- Under Search results see the Bibliography manager setting.
- For the option Show links to import citations into choose EndNote.
- Save.
- Repeat for all your browsers.
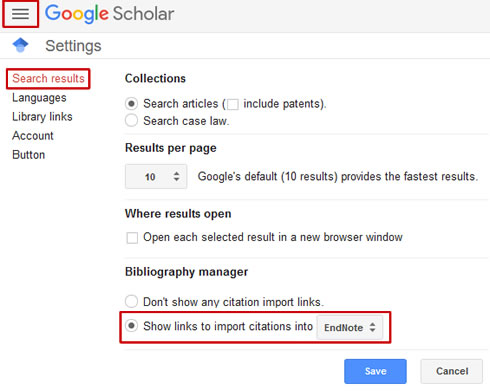
Now, when searching Google Scholar, you'll see the Import into EndNote link beneath each reference.
This allows you to send one citation at a time. See the next tip for how to send up to 20 at once.
Export up to 20 records from Google Scholar into EndNote
Configure Google Scholar to be able to send references to EndNote (see the previous tip), then:
- In Google Scholar Settings, change the Results per page to 20.
- Search Google Scholar and select the star underneath the record you wish to save. Label it or select Done.
- Go to My Library to see your selections.
- Go to Export and choose EndNote.
Unfortunately, this method means citations must be added one by one to My Library. After exporting into EndNote, you must then individually Delete each record to remove from My Library.
See also the next tip Export up to 1000 records from Google Scholar into EndNote.
Export up to 1000 records from Google Scholar into EndNote
To export up to 1000 records from Google Scholar you must download the software Publish or Perish.
Download and install the program (no admin rights required), then:
- Select Google Scholar to start a new search, enter your search terms, then Search.
- Go to Save Results and select Results as EndNote.
- Save the file.
- Locate the saved file and double click to open in EndNote.
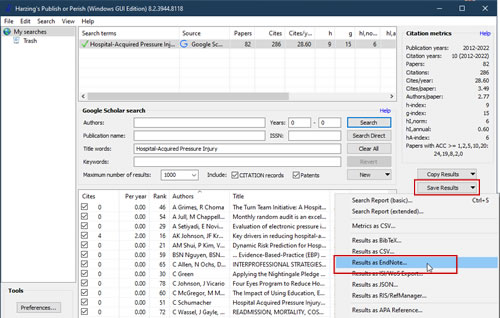
See also the previous tip Export up to 20 records from Google Scholar into EndNote.
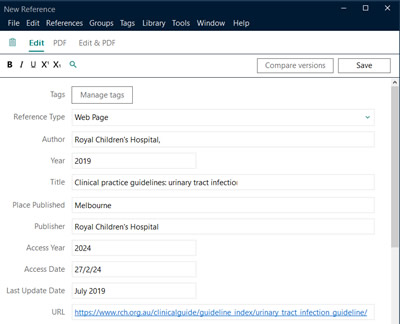
How to create a new reference for online resources
Enter online resources such as reports or webpages manually into your EndNote library
- Create a new reference by going to References/New Reference
- Change the default Reference Type from Journal Article to Web Page
Fields that must be populated will vary depending on your chosen output style; some may be required fields. The example pictured here is for a Clinical Practice Guideline.
Author names
It's usually best to enter individual author names in the format Last name, First name(s).
Commas rule
If there is a single comma anywhere in the name, EndNote will always assume that the text preceding the comma is the author's last name, and text following the comma is the author's first name(s) (and/or initials).
There are a lot of variations in names, for example with multiple-word surnames or when the author is a group or an institution. See the table below for how to deal with the most common.
For references with more than one author or editor enter all of the names on separate lines.
Do not enter "et al." after one or two authors, and do not enter "et al." by itself on a new line. EndNote needs to know all of the author names so it can decide whether it should condense an author list, and if so exactly how to condense it.
Doe, Jane T. |
This format works for common names, and for multiple-word names such as de Gaulle, Charles |
Henry VIII, |
Use a comma at the end to retain the whole name as a single entry |
Intensive Care Unit,, Royal Children's Hospital |
Use a double comma if the name already contains a comma |
Bush, George, Sr. |
Use Last, First, Title for names with titles |
Import XML files
EndNote can only import XML files that were previously generated by EndNote itself. It cannot import XML files created by other databases such as EbscoHost.
Instead, use other export formats like RIS or BibTeX from the databases to import into EndNote.
Cite While You Write (CWYW)
Cite While You Write (CWYW) is too slow
Insertion of citations can be slow, especially with long documents. One solution is to turn off hyperlinking by disabling Link in-text citations.
- In Word, go to the EndNote tab on the ribbon and select the arrow in the Bibliography group.
- Deselect Link in-text citations to references in the bibliography and OK.


Citation numbers are out of order
Sometimes you may find that your citations are not starting at number 1 even though you've used an output style that lists references in order of appearance.
This could be because you have inserted an EndNote citation into a comment balloon or text box (for example, a figure legend or caption). EndNote gives priority to that citation and makes it appear at the top of a numbered bibliography.
To correct this, remove the citation from the comment balloon or text box, or convert the text box to a frame by right clicking and selecting Convert to Frame. See more detailed information about this issue from EndNote support.
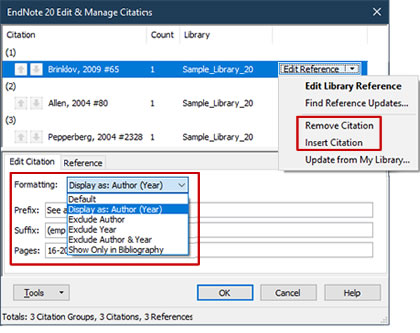
Edit or remove in-text citations in Word
Never select a citation in Word and delete or manually edit it. Hidden formatting characters may be left behind or altered incorrectly, which can result in your document becoming corrupted.
Always use the toolbar commands to edit or delete your citations:
- In Word, select your citation
- Go to the EndNote tab in the Ribbon
- Select Edit & Manage Citation(s).
You can remove a citation, include a page number, or add a prefix or suffix. You can also change the display format, for example, to Author (Year).
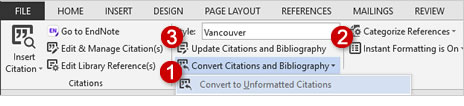
Work with text in linked Word documents
Always unformat your citations before copying text from a Word document that's linked to your EndNote library.
Unformatted citations contain the author's name, the year, and the record number in curly brackets, for example {Smith, 2015 #45}.
When working in unformatted mode your bibliography is not visible in the document.
Unformatted mode is useful when working with large documents (to avoid delays due to processing when inserting or removing references), and when copying, cutting, or inserting text either between documents or within a document.
Go to the EndNote tab of the ribbon in Word and select Convert Citations and Bibliography/Convert to Unformatted Citations. To reformat the citations, select Update Citations and Bibliography.

Work in unformatted mode and turn off instant formatting
When inserting references into a large document, or if EndNote is slow, perform these steps to speed things up a bit:
1. Convert all existing references in your document to unformatted.
All your existing references will be enclosed in curly brackets, for example:
{Nisbet, 2020 #17479}
2. Turn off instant formatting
In the EndNote toolbar in Word, go to Instant Formatting is On and turn it off.
All future citations you add will not automatically format. Instead it will be enclosed in curly brackets.
3. When you have finished adding references, go to Update Citations and Bibliography to format the references.
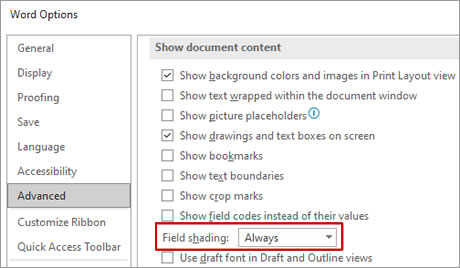
Automatic shading of EndNote content in Word
It may be helpful to display your EndNote-derived content as shaded in your document so it can be easily identified and not accidentally modified or deleted.

Turn on field shading
- In Word go to Options
- Go to Advanced
- Scroll to Show document content
- Select Always from the Field shading menu
Manuscript templates
Use Manuscript Templates in EndNote to prepare a paper for electronic submission to a publisher. Download templates from the EndNote website.
Open Word then open the template file. You may need to enable Macros in Word settings before the Manuscript Template Wizard will launch.
Manuscript Template Wizard is not compatible with Word 2008, 2011, the 64-bit edition of Word 2010, and both the 32-bit and 64-bit of editions of Word 2013 on Windows. On Macs it is not available for Word 2008, 2011, or 2016.
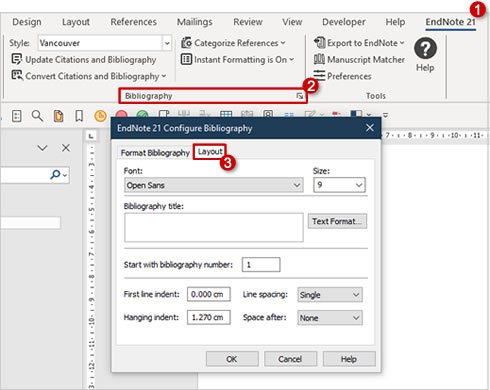
Change the font or spacing in your bibliography
Customise the format and look of your bibliography or reference list:
- In Word, go to the EndNote tab
- Select the drop-down arrow on the Bibliography tab
- Select the Layout tab in the Configure Bibliography dialogue box.
You can make changes to:
- Font style and size
- The bibliography title and formatting
- Reference numbering
- Indents and line spacing.
Use Track Changes with Word and EndNote
You may see the following errors in EndNote when using Track Changes: The requested object could not be found, Command failed, Unknown error, Object has been deleted, or The range cannot be deleted. Or, the document may crash with no specific errors and/or the in-text citations and references become corrupted.
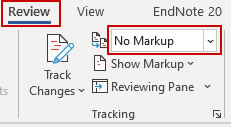
To use Track Changes correctly with EndNote:
- Go to the Review tab in Word
- In the Tracking panel set the markup options to Final mode or No Markup (depending on your version of Word).
If you're on a Mac set it to Original not Markup.
Convert document to plain text
We recommend that you convert your document into plain text when:
- submitting it to a journal for publication.
- sending it to supervisors or reviewers who may use Track Changes*.
To convert your document into plain text:
- Go to the EndNote toolbar in Word
- Select Convert Citations and Bibliography / Convert to Plain Text on the Bibliography tab
- Accept the prompt to save a copy of the document before conversion.
This plain text conversion removes all EndNote field codes, and you will not be able to add further citations. This action is irreversible.
Sending supervisors or reviewers the plain text version of your document avoids possible corruption related to Track Changes; see this related EndNote tip.
* When you receive the reviewed copy of the document back, apply any changes manually to your original copy that still contains the EndNote field codes
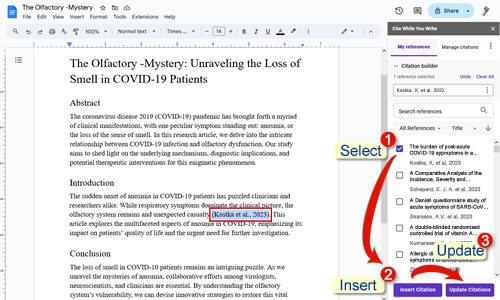
Insert multiple references
To insert more than a single source in one citation:
- Open your Word document.
- Place the cursor where you want the in-text citations to appear.
- In EndNote, select the references you wish to include. Hold down Ctrl (on PC) or Command (on Mac) while selecting noncontiguous references.
- Select Insert Citation.
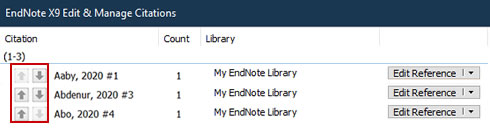
To re-order the citations in Word:
- Right click the in-text citations.
- Go to Edit Citation(s) / More.
- Use the arrows to move up and down.
EndNote prompts you to log in when inserting references
If EndNote is prompting you to sign in when you are inserting references, then the CWYW feature in Word is connecting to EndNote online instead of EndNote desktop.
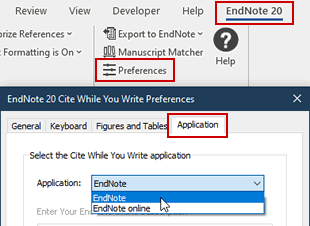
Switch back to EndNote desktop:
- In Word, go to the EndNote toolbar and choose Preferences
- Choose EndNote from the Application menu
Switch between EndNote desktop and EndNote online
You can insert references into a Word document using EndNote desktop, and then switch to using EndNote online, or vice-versa
To allow this you must choose the correct application option for EndNote in Word, depending on which way you are switching. In Word 2007/2010/2013/2016* with EndNote X1 and later go to the EndNote tab and choose Preferences. Choose the Application option you wish to switch to, either EndNote or EndNote online and OK.
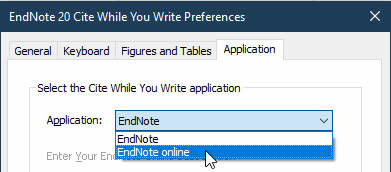
* In Word 2016 for Mac you may need to Quit and restart Word for this to take effect.
How to create a chapter bibliography
EndNote defaults to creating one bibliography at the end of the entire document. If your document is in sections (chapters) you may want to create a bibliography at the end of each section.
See this EndNote Support article for how to do this.
In summary, the steps are:
- Choose your output style:
- For EndNote 20 go to Tools/Output Styles/Open Style Manager.
- For EndNote X9 go to Edit/Output Styles/Open Style Manager.
- Edit the output style:
- For EndNote 20 go to Tools/Output Styles/Edit your chosen style.
- For EndNote X9 go to Edit/Output Styles/Edit your chosen style
- Go to the Sections option in the left pane of the output style to select where you want the reference list to be.
- Save and close.
Manuscript Matcher
EndNote's Manuscript Matcher can suggest the top journals for your manuscript by leveraging indexed data from the Web of Science Core Collection, Journal Citation Reports and the Arts and Humanities Citation Index.
Launch Manuscript Matcher in several ways:
- From the Match tab in EndNote online
- Right click a group from the Groups panel in EndNote desktop
- From the Manuscript Matcher button in the EndNote toolbar in Microsoft Word.
When matches are found, results will show up to ten journals. For each journal, you'll see the match score, journal impact factor, rank, quartile and ISSN.
Compare journals to find the best place to submit your work. Choose the publications you want, and start the process for submitting your work to the ones that match your topic and references.
See this short video demonstration and additional information at the EndNote website.

Using Cite While You Write with Google Docs
EndNote's Cite While You Write add-on now has a native integration with Google Docs and is the perfect tool for collaboration with your research colleagues.
You must have Endnote 21, an EndNote Online account, and you must sync your EndNote library before you begin.
Before you begin it's important to note:
- To prevent account conflicts it is recommended that the principle EndNote account holder share their login details with collaborators.
- If you download the document from Google Docs and open it in Microsoft Word, or vice versa, the field codes will be removed, making the citations unusable.
See this EndNote Knowledge Base article or watch this 4-minute video for all the details.
Importing and Exporting
Export an EndNote library to Excel
You can export the information from your EndNote library to a tab-delimited file and then import that into Excel.
Step 1: Install a new style and backup your library
- Download this Tab Delimited Mar 2025 output style and save it to your computer.
- Use Windows Explorer or Finder to browse to the saved file location and double click the downloaded file; it should open in EndNote.
- In EndNote go to File/Save as. Remove the word "copy" from the end of the style's name, then Save:
- On Windows, save to My Documents/EndNote/Styles
- On macOS, save to Applications\EndNote #\Styles (where # is the EndNote version number).
- Close out of EndNote.
- Important: Make a backup of your library now. This step is vital, so that you can restore the current libary later if necessary.
Step 2: Create a text file of your library
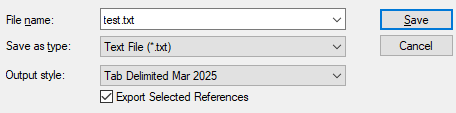
- Open EndNote and select the references that you wish to export.
- Go to File/Export.
- Save as a text file. The Output style must be the tab delimited file that you saved earlier. If that style is not listed, choose Select another style... from the menu dropdown then locate and select it.
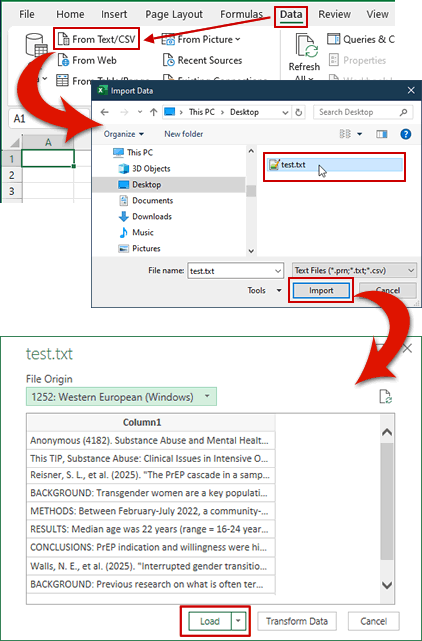
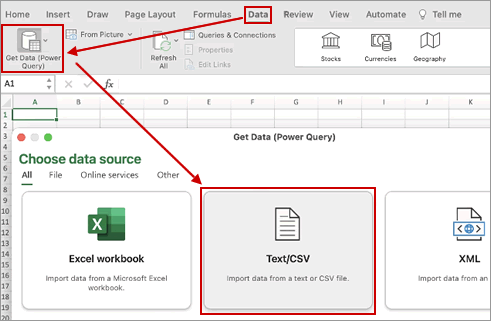
Step 3: Import the saved text file into Excel
- Open Excel to a new blank workbook
- In Windows: Go to Data and select Text/CSV and choose the saved text file to import.
- Select Load.
- In macOS: Go to Data/Get Data (Power Query) then Text/CSV and choose the saved text file. Select Get Data and then Next.
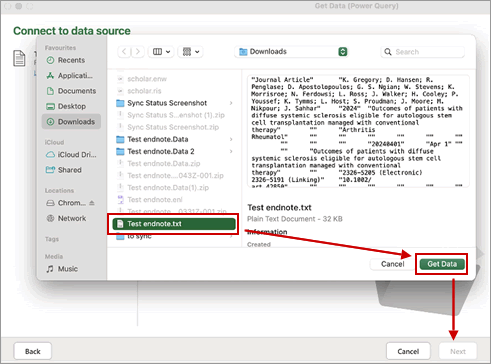
Step 4: Check the imported data
Your Excel file should show one reference per row. If your data shows one reference per row you can save your Excel file and stop here, else proceed.
In our example file below, some references have been split across multiple rows. The papers by Westfall and Reisner are four rows each. This is because the Abstract field in EndNote contained carriage returns.
Step 5: Fix the data in EndNote then import again
- Close out of the Excel file and do not save.
- In EndNote, select all references that you wish to export.
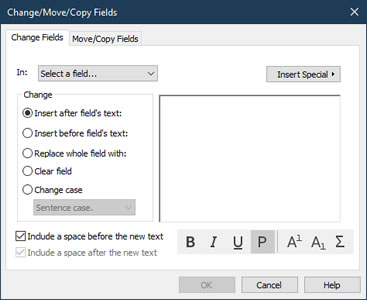
- Go to Library/Find and Replace.
- In Select a field choose Abstract.
- With the cursor in the Find field, go to Insert Special and choose Carriage return.
- In the Replace with field type "-//-" including the quotes.
- Select Change and Ok all the changes.
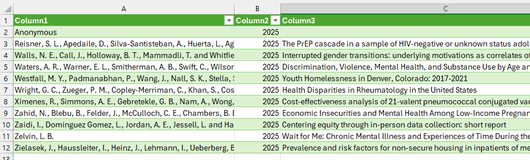
- Repeat from Step 2: Create a text file of your library above to export your references again as a text file and then import that into Excel.

Your Excel file should now look like this. Save your file.
Import an Excel file into EndNote
It is possible to import an Excel spreadsheet of journal citations into EndNote using a multi-step process:
- In Excel: open your file, modify and save
- In Word: open your saved Excel file, modify and save
- In EndNote: import your saved file
Watch this 6-minute video to get the full details, or follow the detailed steps below.
1. In Excel:
- Create a new empty row at the top of the file
- Provide EndNote-recognised headings for each column, for example: Author, Year, Journal, Title, Volume, Issue, Pages
- Save as a Text (Tab delimited) file and close.
2. In Word:
- Open the saved text file
- Turn on the show/hide formatting command
- Create a new blank line at the top of the document and type *Journal Article
- Find/replace occurrences of the word and with a double forward slash // in author fields only (not title fields)
- Find/replace all double quotes " with nothing
- Save and close.
3. In EndNote:
- Open EndNote
- Go to File/Import/File
- Select Choose and locate the saved text file
- Change Import Option to Tab Delimited
- Select Import.
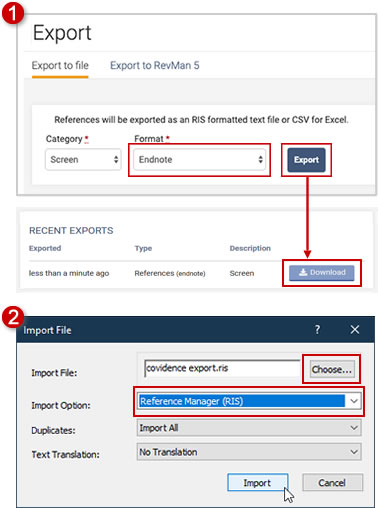
Import EndNote references into Covidence
To import your EndNote references into Covidence you must export them from EndNote either as an XML file or RIS file. Both types will perform the same task.
- XML file
- In EndNote, highlight the references to export
- Go to File/Export
- Save as type: XML (*,xml),
- RIS file
- In EndNote, highlight the references to export
- Go to File/Export
- Save as type: Text file (*.txt)
- Output style: RefMan (RIS) Export.
Export from Covidence into EndNote
- In Covidence export in EndNote format. Find out how.
- In EndNote go to File/Import/File and import as a RIS file:
Customise EndNote
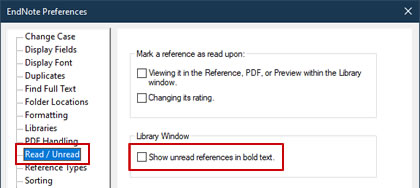
Turn off Read/Unread
Unread references in your EndNote library show up in bold text by default. Once it is read, the reference will change to regular text. If you wish to disable this feature, open EndNote and then:
- Go to Edit/Preferences (or EndNote/Preferences on a Mac)
- Select Read/Unread
- Uncheck Show unread references in bold text
- OK.
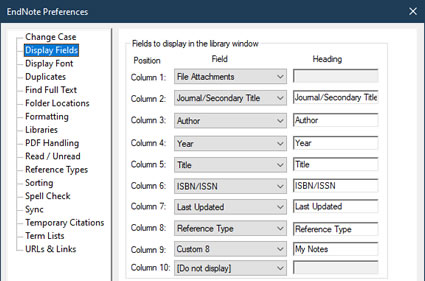
Modify the fields displayed in your library window
You can change the order of an existing column by selecting its header and simply dragging it to the left or right.
You can also change the type of fields, the order of the fields, and their names. Go to Edit/Preferences/Display Fields to see how you can customise the display columns.
If you don’t want a column to display at all select [Do not display] to hide it.
If a suitable field is not available, create your own using one of the Custom fields and giving it a custom name.
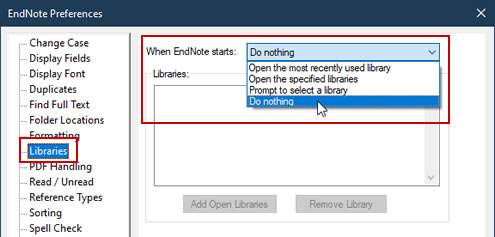
Prompt to open a library
When you open Endnote the last used library will automatically open by default. That's great if you only own a single library, but what if you have several?
If you own many libraries there are other options that may be more useful. Go to Edit/Preferences/Libraries and select the option that works best for you: Open the specified libraries, Prompt to select a library, or Do nothing.
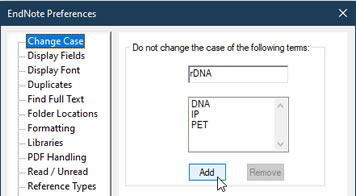
Stop EndNote changing the case of terms
When certain words or acronyms appear in a book or article title, EndNote may change the capitalisation according to the style you are using.
You can add terms to an exclusion list so that EndNote does not change the case of words that should be capitalised in a certain way.
This is useful for acronyms, gene names, proper nouns, equations, or compound words such as EndNote.
- Go to Edit/Preferences/Change Case (on a Mac go to EndNote/Preferences/Change Case)
- Type in the word(s) you wish to include
- Add and OK.
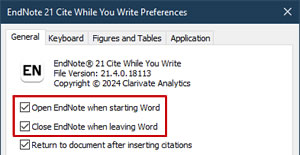
Set EndNote to automatically open and close with Microsoft Word
- In Word, go to the EndNote tab on the ribbon.
- Go to Preferences.
- Select either or both of the check boxes Open EndNote when starting Word and Close EndNote when leaving Word.
Change the window layout to suit your workflow
Use the Layout options to find the best panel arrangement for your workflow. The reference panel displays: details about a selected reference; a preview of the citation in your selected style; and the attached PDF (if any).
Window layouts for EndNote X9
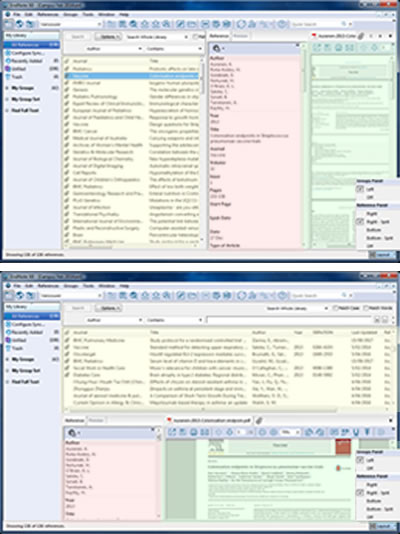
Window layout for EndNote 20 - the panel layout cannot be modified in this version
Window layouts for EndNote 21
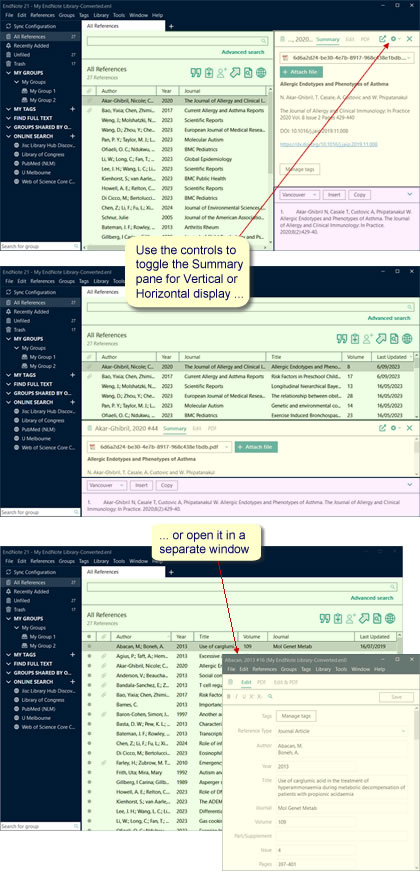
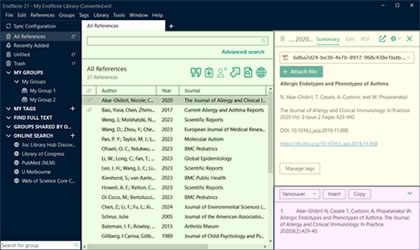
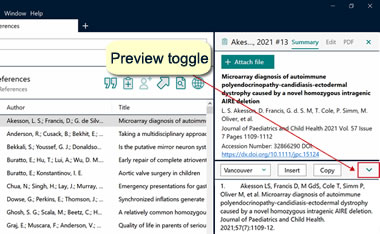
How to show the preview screen in EndNote 20
In EndNote, you can preview how your references will appear in Word
Here's how:
- Double click any reference in your EndNote library to open the Summary tab
- Click the arrow icon to toggle the preview on or off.
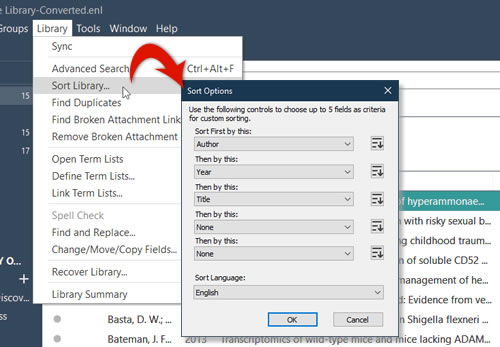
Sort your library
You can click on any column in your EndNote library to sort by that field; click it again to sort in the reverse order.
It's also possible to sort by multiple fields:
- Go to Library/Sort Library…
- Select up to five labels to sort by
For example, you might sort by Author then by Year to get an overview of that author's output.
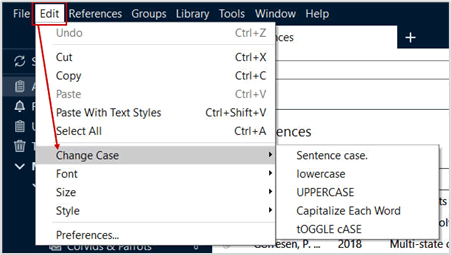
Change case in EndNote
EndNote allows you to change the case, or the capitalisation, of highlighted text within a single reference.
In EndNote X9 these 'change case' options were easily accessible via an icon in the reference window.
In EndNote 20/21 you must go to Edit > Change case to change your text to sentence case, lowercase, uppercase, capitalise each word, or toggle case.
Mac users
Direct export troubleshooting on a Mac
Direct export with Google Chrome on a Mac will fail unless the file format being exported is associated with EndNote in the system preferences.
If the downloaded file does not open see this solution for OS 10.6.x.
Fix slowness issues in EndNote X9 for Mac
If you're still using EndNote X9 for Mac, you may have noticed some slowness issues for earlier builds. See this EndNote Support article about updating to the latest version of EndNote X9.3.3 (Bld 15659).
Storing your EndNote library on a Mac
We've talked before about the best place to store your libraries, and about avoiding network or cloud-synced folders. With recent enhancements to MacOS we think it wise for you to revisit your file storage practises.
From the Endnote website:
“MacOS versions 10.12 (Sierra), 10.13 (High Sierra), and 10.14 (Mojave) contain features to save the contents of the Documents folder in iCloud and to "optimize" storage by storing less-used files only in iCloud online.
EndNote libraries stored in iCloud, even when stored on both the hard drive and online, are subject to corruption over time.
If you choose to store your documents in iCloud, we suggest creating a separate folder in your home folder and saving your EndNote libraries there. Do not store EndNote libraries in iCloud or any other cloud-syncing folder, and do not store EndNote libraries in the Documents folder if you have selected the option to store documents in iCloud.”
Save as compressed library (.enlx) instead of a package (.enlp)
As a Mac user you can save your EndNote library either as a compressed library (.enlx) or a package (.enlp). This allows you to easily save, backup or email your library.
Both options place the EndNote library (.enl) and its associated DATA folder together as one file. We recommend that you save as compressed rather than a package because:
- The compressed library is compatible with Windows.
- It is easier to recover the library (.enl) from the compressed version than the packaged version. This may be necessary if your library becomes damaged or corrupted and you need to rebuild it.
- Direct Export from databases does not work reliably with a packaged library.
Cannot open EndNote on a Mac
If you cannot open a library package (.enlp) on a Mac, move the file from a shared/cloud environment to your local drive and try opening it again.
If it still does not open, extract the package contents:
- Right-click the .enlp file.
- Select Show Package Contents.
- Locate the .enl file inside.
- Double-click the .enl file to open it in EndNote, which may prompt a conversion to a new, working library.
Managing references
Update your existing references
EndNote can search for and retrieve updates for references already in your library:
- Highlight the reference(s) you wish to update.
- Go to References/Find Reference Updates. All updated fields will be highlighted in blue.
- Choose to Update All Fields, Update Empty Fields, or Edit Reference.
- Select Save and continue.
Use Global Change to make bulk changes to all references in a library
You can insert, replace, clear, move or copy text in any field for all references in your EndNote 20 library by going to Library/Change/Move/Copy Fields (for EndNote X9 and earlier it's Tools/Change/Move/Copy Fields).
This is an efficient way to make bulk changes to all your references in your library simultaneously.
If you don’t want the change applied to all references, highlight the references you don't want changed, then cut and paste into a new or different library before performing your bulk change on your current library.
Delete unwanted references from your EndNote library
You can easily delete unwanted references from your library: highlight them and hit the Delete key on your keyboard. The references are now in the Trash folder; they will not be included in your reference count, and cannot be searched or edited.
If you change your mind and want your references back, open the Trash folder, select the references, then drag and drop them into the All References folder.
To permanently delete unwanted references from the Trash, go to References/Delete Trash References (or References/Empty Trash in EndNote X9 and earlier), or you can also right click the Trash folder and Empty Trash. Choose wisely and be warned: emptying the Trash cannot be undone.
Use one EndNote library per document, and use Groups to manage your projects
While a Word document can be linked to multiple EndNote libraries, it's best to use only one library per document.
Since you can only share a single EndNote library, it makes sense to use one library for everything. Use the Groups feature in EndNote to manage your citations for different projects or documents. Right click My Groups or use Groups from the main toolbar to create, rename, or delete groups.
See our tip on Using Groups for more information.
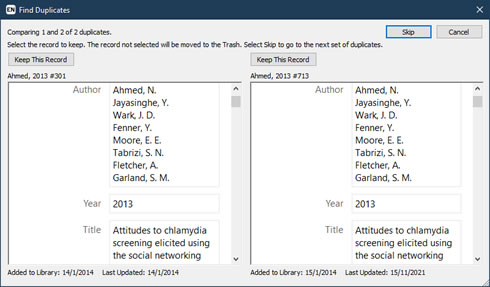
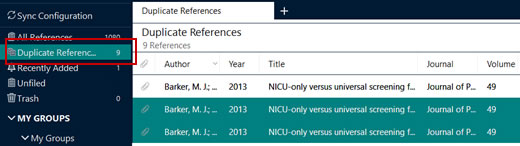
Identify duplicate records in your EndNote library
EndNote will identify a record as a duplicate if two or more records have the same reference type (for example Journal Article), and include the same information in the Author, Year, and Title fields.
- Select all the references in EndNote that you want to check for duplicates
- Go to Library/Find Duplicates (or References/Find Duplicates for EndNote X9 and earlier).
- The Find Duplicates dialogue box will display, allowing you to view each duplicate record and choose which one to keep.
- The original (the first one added to EndNote) will always appear on the left. Choose Keep this record for the version you wish to keep.
If your library is small, go ahead and use this method to remove duplicates. However, if you have many hundreds of references it's a lengthy process to go one by one, so:
- Choose Cancel to go back to the duplicate records that EndNote found.
- Delete the duplicates by using your Delete key or drag them to the Trash.
While the Find Duplicates feature will not find all duplicate references, you can increase its sensitivity by defining which fields EndNote uses to compare references.
Go to Edit/Preferences/Duplicates (or EndNote/Preferences/Duplicates on a Mac) to select the fields, choose Apply then OK.

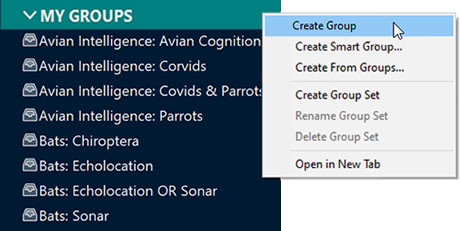
Using Groups
We recommend having only one EndNote library. So how do you manage your references if you have multiple projects?
You can organise the references in your library into group sets and groups. Using this example, you will see the following group sets: Avian Intelligence and Bats.
You cannot place references directly into groups sets, but must create groups beneath the group sets.
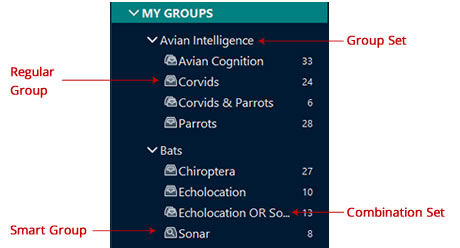
Although there are different types of groups, such as smart groups and combination sets, you will probably only need regular groups.
Right click My Groups to create a group or group sets.
If you plan to sync your library, only regular groups will display in your online library. Group sets, smart groups and combination sets do not display.
As such, we recommend that you use regular groups only and incorporate the group set name within the group name.
Using Tags
This feature is only available in EndNote 21 and later.
Use tags to organise your references to make them easier to find and to divide tasks among team members. Tags will carry across when you share your library as well as sync across platforms.
Create or modify a tag
Create a tag by clicking the + sign next to MY TAGS in the navigation window. Give your tags meaningful names and assign a colour.
Modify or create tags by using Tags in the main menu, or by right-clicking MY TAGS.
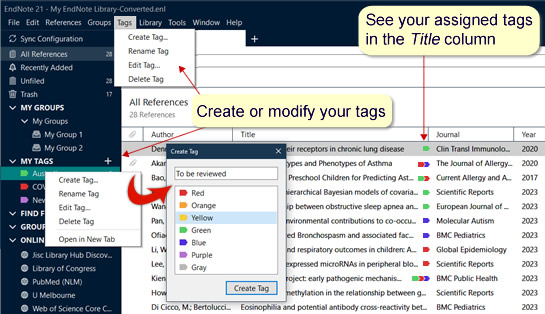
Assign a tag to a reference
You can assign one or multiple tags to your reference(s):
- Either drag and drop your selected reference(s) onto a tag name in the MY TAGS area.
- Or right click your reference(s), go to Manage Tags and choose from the Available tags.

Use multiple libraries simultaneously
You can open more than one EndNote library at a time. You can copy, cut and paste references from one library into another using the Edit menu or keyboard shortcuts.
We don't recommend multiple libraries, but rather keeping one large library and using Groups to keep projects separate. Remember: if you intend to sync your library with EndNote Web you can only do this with a single library.
Traveling library: export references from Word
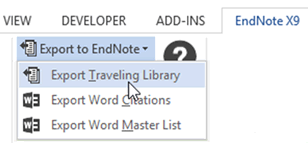
You can export the references from your Word document into a new or existing EndNote Library.
The references must have been added using EndNote and must contain field codes. In Word, go to the EndNote toolbar and choose Export to EndNote/Export Traveling Library.
Create a stand-alone reference list
You can create a reference list without writing a paper, the end result being an independent bibliography. Here’s how:
- Set your output style (for example: Harvard) in EndNote.
- Highlight multiple citations using the Ctrl key or use Ctrl+A to select all.
- Go to Edit/Copy Formatted.
- Open Word and paste.
If you wish to change to a different output style, select the new output style in EndNote and repeat steps 2-4.
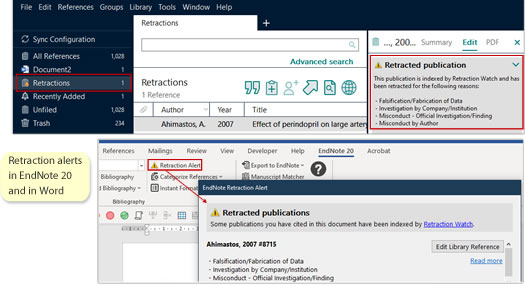
Retraction alerts
EndNote 20.2 has been integrated with the Retraction Watch database to flag retracted articles
The Retraction Watch database includes nearly 30,000 retracted papers and conference abstracts dating back to the 1970s, and is updated multiple times a week.
In EndNote, a retracted item will show in the auto-group and reference window.
Find out more at the Clarivate support website.
To activate retraction alerts, you must sign into your EndNote online account. You will then receive alerts for every library you open.
EndNote will check for retractions when a library is opened, or when a reference is added or edited. Retractions are identified by DOI or PubMed ID. In EndNote 20.3, retracted articles are flagged in the Word document. In case you missed seeing the item flagged as a retraction in your EndNote library, it will show up in Word when you cite it.
Output styles
APA 7th output style
The APA 7th style is available in recent versions of EndNote. If you are using an early EndNote version you can download the APA 7th style.
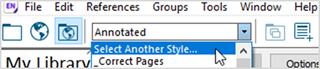
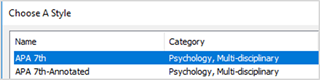
EndNote X9
Go to your current output style to Select Another Style. Select APA 7th from the list, then switch to that style.
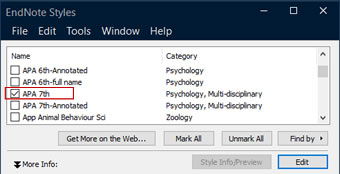
EndNote 20/21
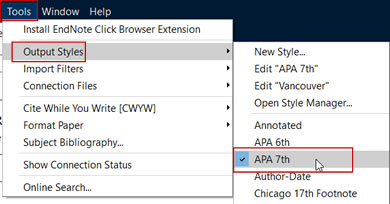
Go to Tools/Output Styles/Open Style Manager. Locate APA 7th style and select the checkbox, then close the dialogue box.
Now go to Tools/Output Styles and choose APA 7th from the list.
How to add AMA Manual of Style
You must activate the JAMA style in EndNote to have your citations appear in AMA Manual of Style format.
- Go to Edit/Output Styles/Open Style Manager (EndNote X9) or Tools/Output Styles/Open Style Manager (EndNote 20/21)
- Scroll the list to find JAMA and select it
- Close out of the dialogue box
- Go back to Edit/Output Styles or Tools/Output Style and select JAMA from the list.
Change the output style in a Word document
When you have chosen your current style in EndNote, it's not automatically updated in your Word document.
To do that, we'll use JAMA output style as an example:
- In Word, go to the EndNote tab
- Go to the Style drop-down menu
- Choose JAMA (if present) from the drop down list or choose Select Another Style... and select JAMA from there
- Select OK to finish.
Download new output styles, filters, connections and templates
EndNote comes preloaded with output styles, import filters and connection files. You can download more from the EndNote website.
Download the desired file and double click to open it in EndNote. Go to File-Save As and delete ‘copy’ from the filename, then save.
Edit output styles in EndNote
If there is no EndNote output style that exactly meets your requirements you can look for an existing one via Tools/Output Styles/Open Style Manager or download a new style from the EndNote website.
Edit an existing output style
If none of those are suitable you can choose one that is similar and edit it.
For example, let's say the journal articles in your reference list must look like this:
Alexander M, Barnes C, Barnett P. Prospective audit of patients with haemophilia: bleeding episodes and management. J Paediatr Child Health. 2012;48:177-9.
We can see that the Vancouver style is similar:
Alexander M, Barnes C, Barnett P. Prospective audit of patients with haemophilia: bleeding episodes and management. J Paediatr Child Health. 2012;48(2):177-9.
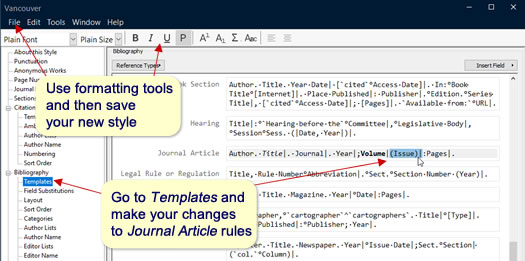
Edit the Vancouver style to suit your needs:
- Go to Tools/Output Styles and select Vancouver as the current style
- Go to Tools/Output Styles/Edit “Vancouver”
- Select Templates under Bibliography in the navigation, then scroll to Journal Article on the right
- Delete (Issue) and one of the pipe signs either side of it ( | )
- Select Volume and and use the formatting tools to make it bold
- Select Title and use the formatting tools to make it italics
- Go to File/Save and save the style as Vancouver Copy
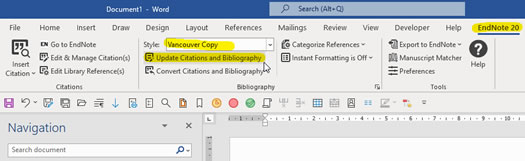
- In Word, select Vancouver Copy as the output style, then select Update Citations and Bibliography.
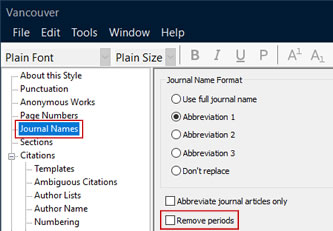
Remove full stops from the journal abbreviated name
You may find in your reference list that journal names are displaying in abbreviated format with full stops, for example: Ann. Plast. Surg. To remove the full stops you'll need to edit your current output style. Let's say you're using Vancouver…
In EndNote
- Go to Edit/Output Styles/Edit “Vancouver” (EndNote X9 or earlier) or Tools/Output Styles/Edit “Vancouver" (EndNote 20)
- Select Journal Names
- Select Remove periods
- Save the output style as "Vancouver copy"
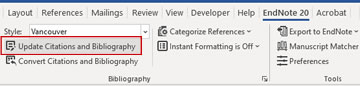
Then ... in Word
Select Update Citations & Bibliography from the EndNote toolbar to display journal names without full stops.
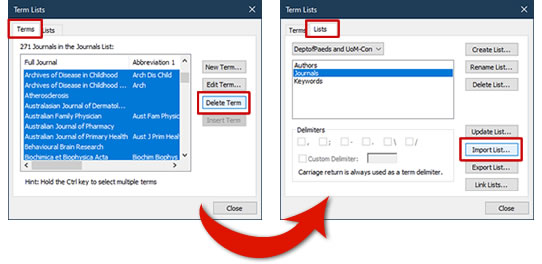
How to display journal names in abbreviated format - Part 1
To make your journal names appear in abbreviated format:
- In EndNote go to Tools/Open Term Lists/Journals Term List (EndNote X9 or earlier) or Library/Open Term Lists/Journals Term List (EndNote 20).
- Select all journal names in the Terms List field and select Delete Term.
- Now that you've deleted your journals term list you must import new ones.
- Select the Lists tab and choose Import List.
- Select the Medical terms list and Open.
- Repeat Step 4 to import other lists, for example BioScience. Close the dialogue box when you have finished importing.
- In Word go to the EndNote toolbar and select Update Citations and Bibliography to update the journal names to abbreviated format in your current document.
See Part 2 of this tip for how to manage journal names that did not abbreviate using this method.
How to display journal names in abbreviated format - Part 2
Part 1 of this tip showed you the basic steps for displaying journals names in abbreviated format but some journal names may still not appear in abbreviated format.
Let's take as an example the journal International Journal of Radiation Oncology Biology Physics, and say you're using Vancouver style. It's still not displaying in abbreviated format even after you've followed the steps outlined in Part 1.
It's likely that the EndNote record you imported containing that journal's name in the citation doesn't precisely match the how the journal's name is listed in EndNote's index.
Here's how to find out, and how to fix it:
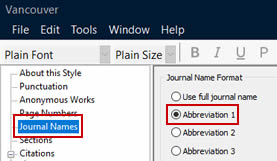
| 1 | First you must check which abbreviation type is being used by your output style. Go to Edit/Output Styles/Edit “Vancouver” (EndNote X9 or earlier) or Tools/Output Styles/Edit “Vancouver" (EndNote 20), and take a look at Journal Names. Here you can see that Abbreviation 1 is being used. Remember that! Close out of the dialogue box. |
 |
|---|---|---|
| 2 | Now go to Tools/Open Term Lists/Journals Term List (EndNote X9 or earlier) or Library/Open Term Lists/Journals Term List (EndNote 20) and find your journal. Select it, and go to Edit Term… See how to add a journal title if it is not listed here. |
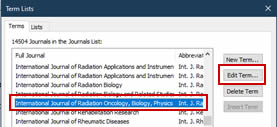 |
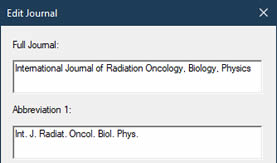
| 3 | Check the Full Journal field and make sure it matches precisely with how the journal name is shown in your record. Spaces, commas, ampersands etc. must match exactly. You can see here also how it will be abbreviated by looking at the Abbreviation 1 field that you remembered in step 1. |
 |
How to display journal names in abbreviated format - Part 3
Part 1 of this tip showed you the overall method to have EndNote display journal names in abbreviated format.
Part 2 showed you how to manage journal names that did not get abbreviated using this method.
Now in Part 3 we show you how to add a new journal name if yours is not present in the EndNote database.
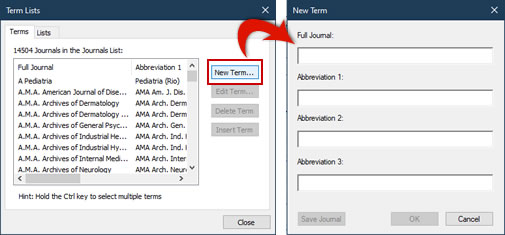
- Go to Tools/Open Term Lists/Journals Term List (EndNote X9 or earlier) or Library/Open Term Lists/Journals Term List (EndNote 20). Check carefully that your journal is not already present.
- Select New Term
- Add the full journal name in the Full Journal field
- Add the abbreviated format in the Abbreviation 1 field
- That's it! OK your way back to your EndNote library.
Sync and share
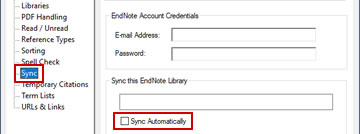
Deactivate automatic sync to improve performance
You can synchronise between EndNote desktop and EndNote Web manually or automatically.
If you experience slowness or constant crashes, you can deactivate automatic sync in your EndNote preferences. Here's how:
- Go to Edit/Preferences (or EndNote/Preferences on a Mac)
- Select Sync
- Deselect Sync Automatically
- Select OK.
Sync your EndNote library across all your devices
You can sync your library across multiple devices so you can access it from a desktop, laptop, or iPad app. Changes will be merged so that your library is up to date on all your devices.
- Go to Tools/Sync (EndNote X9 or earlier) or Library/Sync (EndNote 20/21).
- Log in, or create a new online account.
- Choose Yes when prompted to create a backup of your existing library before syncing.
- Go to Edit/Preferences/Sync to manage your Sync preferences and nominate which library to sync. You may sync only one library.
Your first sync may take a long time depending on the size of your library and the number of attachments. Subsequent syncs are usually faster, as only incremental changes are made.
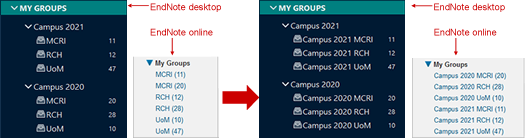
Sync groups and group sets
When you sync, your online library will display all references from your desktop library but will not retain the Group set: Group naming structure.
The online library will only show Groups in alphabetical order.
In these sample figures, note the difference between desktop and online versions.
To keep the Group set and Group hierarchy, rename the groups in your desktop library as Group set: Group.
Share your EndNote library
You can share your entire library with up to 100 others using EndNote X9, up to 400 others in EndNote 20, or up to 1000 others in EndNote 21. Everyone can add to, annotate and use the library at the same time, anywhere.
Sharing a desktop library includes sharing the PDF attachments. Additional share features mean you can share just a portion of your library, such as a Group, and can allow either Read & Write access or Read Only access.
You must have an EndNote Online account to share your library or to open a library that has been shared with you. You can sync and share a single library only, not multiple libraries. The library that you share will be the one that you synced and can access online using either a web browser or the EndNote app for iPad.
To share a library:
- Sync it first. Watch a video to see how.
- Go to File/Share to invite others to share. Enter the email address that the sharee uses to sign into their EndNote Online account.
Tech tips
How to install EndNote
Library members can install EndNote at work and at home. More information here.
File handling tips and upgrades
- Keep your library (*.enl) and its *.data folder together at all times. If you move your library be sure to move the *.data folder as well; these two items must remain in the same location.
- Never store your working library (*.enl and *.data) in a folder that automatically syncs to cloud storage services. See our tip EndNote and the cloud.
- Do not open your EndNote library from a shared/network drive, cloud storage, or a USB drive. Always make a copy to the local drive, then copy back to your external device when you've finished working.
- Be sure you're working with the latest version of EndNote. In EndNote go to Help/About EndNote to see what version you have. You can also choose Check for Updates to see if there are any updates pending. You must have administrator rights on your computer to install updates.
Backup or transport your EndNote library
The easiest way to copy, backup or email your EndNote library is to compress it first. The compression process combines the two parts of your library (.enl file and DATA folder) into a single .enlx file.
Go to File/Compress library (.enlx), choose your options, and Save.
This file can be copied to external media such as a USB or external drive, or attached to an email.
Do not open the compressed EndNote library from a USB or external drive. Instead, move it to your computer's local hard drive before opening it. See more tips on EndNote library storage.
Recreate your EndNote library from the DATA folder
If you've accidently lost or deleted your EndNote library you can recreate it from its companion DATA folder
Each of your EndNote libraries, an .enl file, has a matching DATA folder with the same name as your library. So if your EndNote library is named Autism.enl, you will also have an Autism.DATA folder in the same location.
To recreate your library if the .enl file is missing:
- Open Notepad or any text editor.
- Save this new blank text document with the same name as your missing library - Autism.enl - in the same location as your DATA file.
Double click Autism.enl to open EndNote and see your recreated Autism library.
A word about file extensions
Windows: By default Windows doesn't show file extensions, so your newly created text file may be a .txt instead of an .enl. See how to show file extensions, then rename the .txt to .enl (ignoring the warning about changing file extensions).
Mac: Locate your newly created file using Finder. Select it then press Command+I and check the Name & Extension field to rename if necessary.
EndNote and the cloud
EndNote is not compatible with cloud storage services. If you store your working EndNote library (that's the *.enl file and its partner *.data folder) in a folder that regularly syncs to the cloud, you will experience loss of data and corruption of your library.
EndNote support says:
"Never store an EndNote working library on any cloud service for sharing, or even just for your own use on multiple computers. This will eventually lead to library corruption because of the way the cloud services synchronize files over the Internet. Such unusable cloud services would include, but are not limited to:
- Amazon Cloud
- Box
- Dropbox
- Google Drive
- iCloud
- SharePoint
- OneDrive
- SugarSync
Also, never store a working library on a flash drive.
The reason these methods are inadvisable is that when you are working in EndNote, it is saving data to multiple files, and the data must be saved in a set sequence, as described above. When cloud services transfer that data, they may change the sequence of file saves. This eventually leads to library corruption. The library may appear to be fine for days, weeks, or even months, but will eventually be corrupted."
You can store the compressed library (the *.enlx file) in a synced folder, for backup purposes, but do not open or use the library from cloud storage locations. See the EndNote knowledge base for more information.
Also see our other storage tip specific to Macs.
Upgrade EndNote
Apple has dropped all 32-bit application support, with implications for both PC and Mac users of EndNote
The easiest way to avoid incompatibilities is to ensure you are using the latest version of EndNote on all your devices. Open EndNote and go to Help/About to find your current version.
You must uninstall prior versions of EndNote before installing an upgraded version.
If your EndNote version is prior to X9 you can borrow an install disk from the Library, or contact us if you have no disk drive. If you are already on X9 and wish to stay on that version you can update to the latest X9 build here.
Version X9.3 onwards for Mac is compatible with MacOS Catalina*. Version X9.3 onwards for Windows is cross-compatible with X9.3.2 Mac.
After upgrading
When you first open your EndNote library that was created with an older version, you will receive the following message:
This library was created using an earlier version of EndNote and needs to be converted for use with this version of EndNote. A new, converted library will be created that can only be used with X9.3 and later, but the original library will not be changed. To continue using the library in X9.2 and earlier, use the original library or use EndNote sync. Continue with the library conversion.
Your old library will be converted and be renamed to My EndNote library-Converted.enl.
If you try to open this converted library or any library created on X9.3 onwards on an earlier version of EndNote, it will open a blank library.
* It is expected that MacOS 10.15 Catalina will not run EndNote X8 and earlier. If you wish to continue using EndNote X8, do not upgrade to Catalina.
What to do when your library won't open
If your EndNote library won't open, try the following:
- Instead of double-clicking an .enl file to open your library, open the EndNote program first, then go to File/Open Library.
- Check that your library is saved locally on your device and not stored on a shared/cloud drive. EndNote libraries are best saved in My Documents and not in a hierarchy of folders/subfolders.
- If you are trying to open a compressed/archived file e.g. .enlx, check that there are no EndNote libraries (.enl and DATA) already with that name. If they are present, rename the .enlx file.
If your EndNote library opens up blank, upgrade your version of EndNote because the library you are trying to open was created on a later version. Go to Help/Check for updates.
The EndNote toolbar in Word disappears after Office 365 upgrade
If you've recently been upgraded to Office 365 you might find that the next time you open Word your EndNote toolbar has vanished. Make sure you're using the latest version of EndNote, and upgrade or install the latest patch if you're not.
If you've done that and the tools still don't show, here's how to get them back:
Windows
- In Word, go to File/Options/Add-ins
- In the Manage field make sure COM Add-ins is selected, and click Go
- Check the box EndNote Cite While You Write, then OK
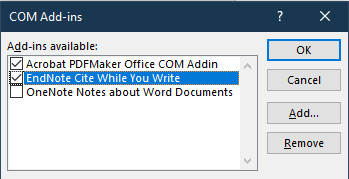

If that doesn't solve the problem, or if EndNote Cite While You Write is not listed in COM Add-ins, you may need to try some more advanced solutions.
See this EndNote support article. If you're doing this on an RCH computer, some solutions require admin rights, so you'll need to contact IT to apply the fix.
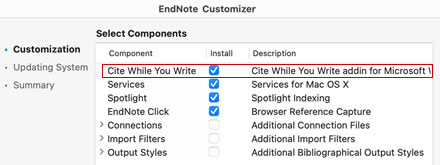
MacOS
- Close Word and open EndNote.
- Select the EndNote menu, then Customizer.
- Ensure that the Cite While You Write check box is selected.
- Click next until the Customizer is finished and open your library.
- Open Word and see if the EndNote tab appears on the toolbar.

If the tools still do not appear you may need to try more advanced solutions. See this EndNote support troubleshooting article, or this EndNote support note on Apple M1/M2/M3 chip compatibility.
Working with PDFs
Use EndNote to find PDFs
EndNote can retrieve PDFs of your references over the internet. However, not all publishers and vendors permit this type of access to their content, so success will vary.
Go to Edit/Preferences:
- Find Full Text:
OpenURL Path: https://libkey.io/libraries/1679/openurl
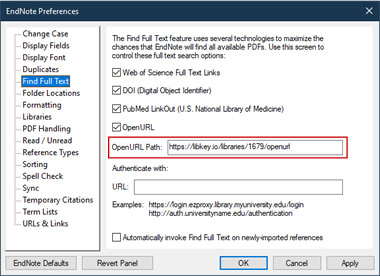
- URLs & Links:
ISI Base URL:
https://go.openathens.net/redirector/royalchildrenshospital.gov.au?url=
OpenURL Arguments: replace WoS with endnote
Find the PDFs:
- Select the references in your EndNote library.
- Go to References/Find Full Text/Find Full Text.
Manually import PDFs into your EndNote library
You can import bibliographic information from a PDF or folder of PDFs, provided the PDF files came from the publisher or other full text provider and the PDF contains an identifiable DOI.
A successful import will show citation details along with the PDF file attached.
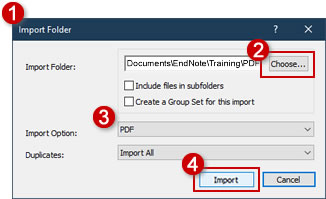
Method 1: Import from a folder
- In EndNote go to File/Import/Folder.
- Choose the folder you wish to import.
- Ensure PDF is selected in Import Option.
- Select Import.
Method 2: Drag and drop
- Use Windows Explorer (or Finder on a Mac) to navigate to the PDF.
- In EndNote, double click any reference to open the right pane.
- Select the PDF tab, then drag and drop your PDF directly on to the pane.
Automatically import PDFs
Save all your PDFs into a folder of your choosing and set EndNote's PDF Handling feature (in Edit/Preferences) to automatically import and rename the PDFs.
Each PDF will be imported as a separate citation but only those with a DOI (Digital Object Identifier) will be populated with the full citation information.
Automatically find full text on import
EndNote can be configured to automatically find full text for newly-added references.
In EndNote:
- Go to Edit/Preferences/Find Full Text (on a Mac go to EndNote/Preferences)
- Select Automatically invoke Find Full Text on newly-imported references
- OK.
Extract all PDFs from your EndNote library
When you attach a PDF to a reference in EndNote it is stored in an individual folder inside your library's DATA folder. You can extract all these PDFs, here's how:
- Create a new folder anywhere called, for example, My EndNote Library PDFs
- Use Windows Explorer or Finder to locate the EndNote DATA folder, for example My EndNote Library.DATA, and open it
- Open the PDF folder
- Search for .pdf to get a list of all PDF files
- Copy and paste these into the new folder you created
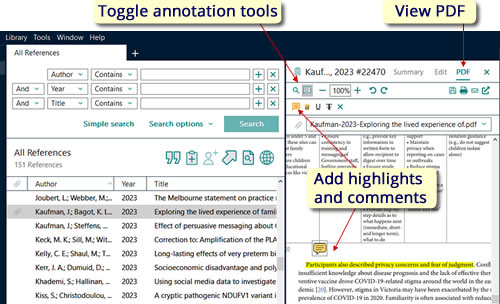
Annotating a PDF
After attaching a PDF to a citation you can preview and annotate it.
Select the PDF tab in the preview panel (double-click your reference if it's not showing).
Toggle the annotation features, which include highlighting and adding a sticky note.
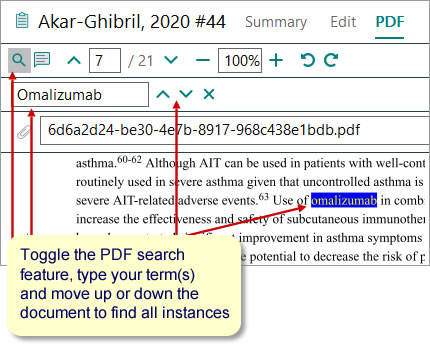
Search within PDFs
PDFs with machine readable text can be searched within EndNote once they have been attached to a reference.
Select the PDF tab from the Summary pane and then select the Search option. Type in your query and search the document using the up/down arrows.